How to Create a Paid Event
Feature Overview
The Payments feature allows your organisation to collect money from residents directly through the platform. Once a Stripe account is connected, you can charge for events (such as workshops, dinners and ticketed activities).
Payments are processed securely by Stripe, and the funds are paid out to your nominated bank account. You can connect a single Stripe account at the organisation level or connect multiple Stripe accounts and choose which one each event or bookable should pay into — useful for communities that need to keep funds separate (for example, when a clubhouse and a café are run by different operators).
Residents pay using a credit or debit card directly in the app. Where appropriate, you can also accept cash and mark the payment as received yourself.
TOP TIP: You don't need to connect Stripe to create a paid event as you can set the event to 'Cash'. But to learn how to connect a Stripe Account, click here Setting Up & Managing Payments
Creating a Paid Event
Once your Stripe account is connected, you can create a paid event. To do this, go to Events in the left-hand menu and click the Create Paid Event button at the top of the events list.
The process is the same as creating a normal event, but with a few additional tabs to configure payment and pricing details.
The new tabs are:
- Payment — Tickets and payment options. This can be found next to the Time Slots
- Manage -
The Payment Tab
The Payment tab is where you decide how residents pay for this event. The fields are:
- Payment Methods — tick the boxes for the methods you want to accept. Card charges the resident through Stripe in the app. Cash lets the resident reserve a spot and pay you in person, which you then mark as paid in the admin portal.
- Payout Method — choose which connected Stripe account this event should pay into. If you only have one account, this will already be selected. If you leave it as the default, your organisation default account will be used.
- Ticket Options — the different price tiers for this event (for example, Standard $50, VIP $100, Child $20). For each ticket option you can set:
- A name (e.g. “General Admission”).
- A short description shown to residents.
- The number of slots available at that price (so you can cap how many VIP tickets are sold).
- The price in your organisation's currency.
- Add-ons (optional) — extras a resident can add to their booking, such as a meal upgrade or merchandise.
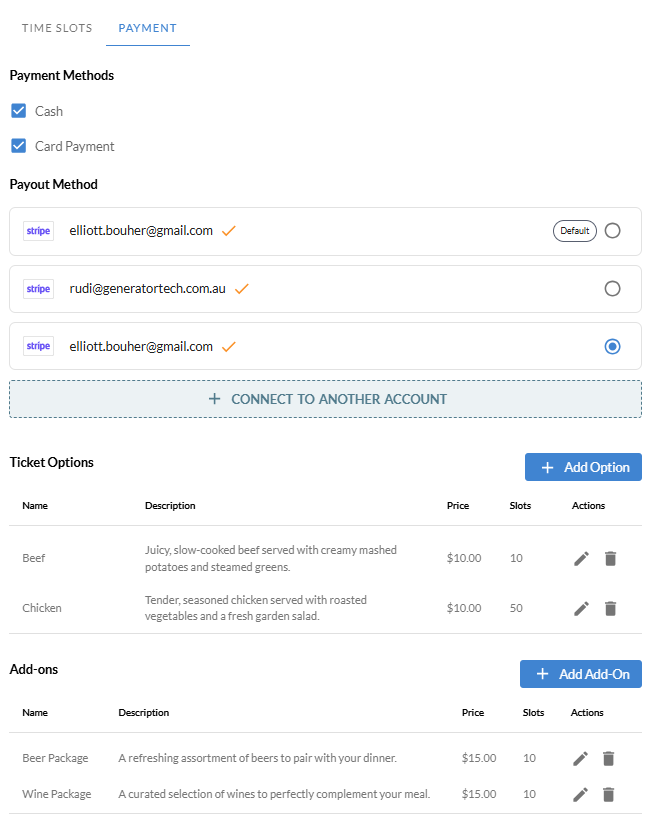
TIP: You must add at least one ticket option before you can save a paid event. If your event has a single price, just create one ticket option called “General Admission” and set the price.
When you save the event, residents will see it in the Events section of the app and can purchase a ticket immediately.
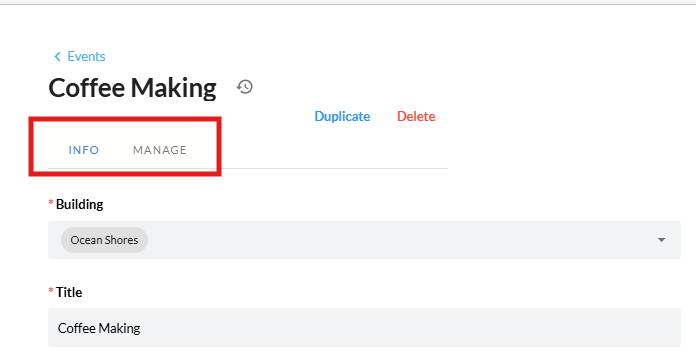
The Manage Tab
Once a paid event has been created, opening it from the events list will show two tabs at the top of the screen:
- Info — the event details you set up when creating it (name, description, time slots, ticket options, etc.). You can come back here to edit those details at any time.
- Manage — the day-to-day operations screen for the event. This is where you check sales, see who has booked, mark cash payments as received, and pay out the takings.
The Manage tab is split into a few sections, working down the page:
Time Slot Selector
If your event runs across multiple dates or sessions, the left-hand column shows a list of time slots. Click a time slot to load the figures and attendee list for that specific session. All the data on the right-hand side updates to match the selected time slot.
Payout Details
At the top of the right-hand column, you'll see the same Payout Details panel that's on the Organisation Payment settings page, but scoped to this event:
- The Stripe account the event is paying into (with its email).
- Total Balance, Future Payouts and In Transit to Bank figures for that account.
- A PAY OUT button to manually push the available balance to your bank.
- A small pencil icon next to the heading — click it to change which Stripe account this event pays into.

Booking Progress
Below the payout panel, the Booking Progress card shows how many tickets have been sold for the selected time slot — for example, 12 / 50 Tickets Sold with a percentage bar. This gives you a quick visual of how the event is filling up.
Ticket Options & Add-Ons
The Ticket Options and Add-Ons sections let you add, edit or remove ticket tiers and add-ons even after the event has been published — useful if you need to release a new tier (e.g. a last-minute discounted ticket) or remove an add-on that's sold out.
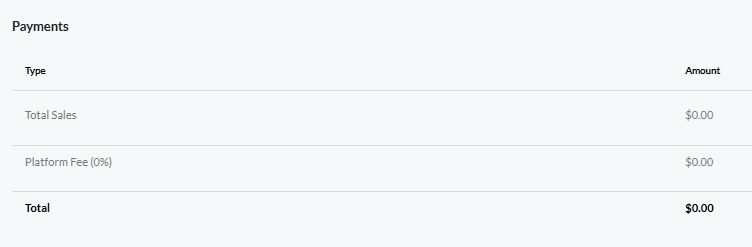
Payments Breakdown
The Payments table summarises the financials for the selected time slot:
- Total Sales — how much residents have paid for tickets and add-ons.
- Platform Fee — the percentage retained by the platform (the percentage is shown next to the label).
- Total — what's left after the platform fee, which is what you receive in your Stripe account.
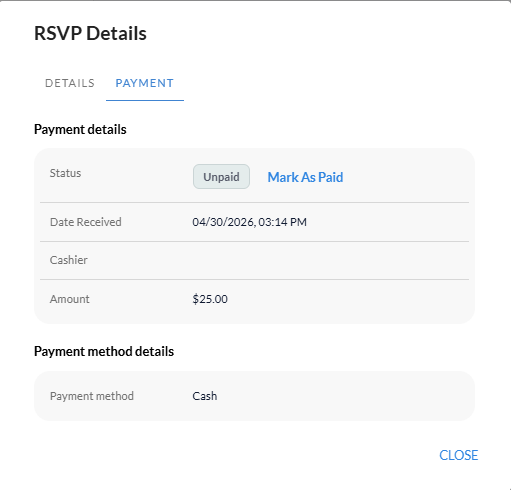
RSVPs (Attendees)
At the bottom of the Manage tab is the list of residents who have RSVP'd or bought a ticket for the selected time slot. Each row shows the resident, their ticket option and their payment status.
Click on a row to open the RSVP details, where you can:
- Mark as Paid — use this when a resident has paid you in cash. The transaction status flips to paid and they get a confirmation in the app.
- Mark as Unpaid — reverses a cash payment if it was marked by mistake.
- Refund — sends the money back to the resident's card via Stripe. Only available on successful card payments.
TOP TIP: The Manage tab is the screen you'll spend the most time on once an event is live. Most teams keep it open during the event itself so they can mark walk-ups as paid as people arrive at the door.
What Residents See
It's worth understanding what a resident actually goes through when they buy a ticket, so you know what to expect when they have questions.
A resident opens the Events section in the app and taps on the event. They see the event details, the available time slots and the ticket options you set up. To buy a ticket they:
- Choose the time slot they want to attend.
- Pick a ticket option (e.g. General Admission or VIP) and the quantity. If you set up add-ons, they can add those here too.
- Choose a payment method. Card charges them through Stripe; Cash (if you enabled it) lets them reserve a spot and pay you in person on the day.
- For card, they enter their card details — or pick a card already saved to their profile — and confirm.
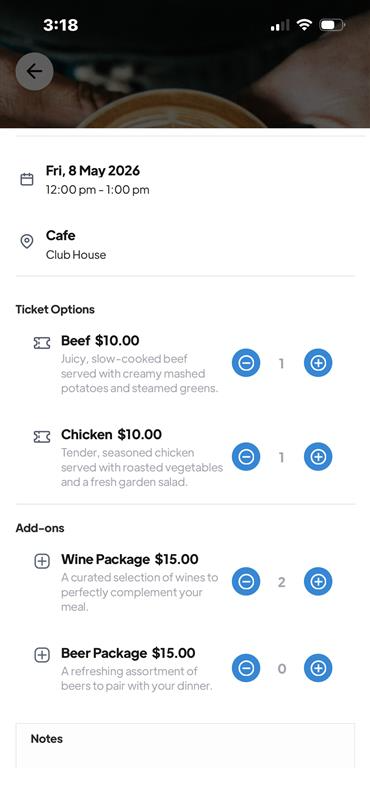
Once payment succeeds, an event confirmation (ticket) is created and saved to their app, with the date, time slot, ticket type and order number. They can come back to it any time from the Events section.
If they chose Cash, the booking is held with a status of Unpaid. They are expected to pay you on the day, and you mark them as paid from the Manage tab when they arrive.
Viewing Balances & Paying Out
You can see how much money is sitting in your Stripe account at any time from Settings > Organisation > Payment.
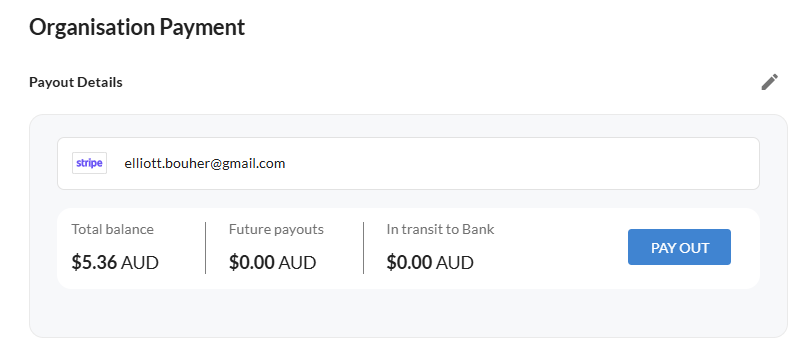
The Payout Details panel shows three figures:
- Total Balance — money that has cleared and is ready to be sent to your bank.
- Future Payouts — money from recent payments that is still being held by Stripe (typically a couple of days while the card transactions clear).
- In Transit to Bank — money that has already been sent to your bank account but hasn't landed yet.
If you want to send your available balance to your bank straight away, click the PAY OUT button. Otherwise, Stripe will pay you out automatically on the schedule you set up during onboarding (most commonly weekly or daily).
If you have multiple Stripe accounts connected, use the pencil at the top of the panel to switch between them — balances are tracked separately for each account.
Refunds & Transactions
Sometimes you need to give a resident their money back — for example, an event is cancelled or a resident can no longer attend. Refunds are issued through the admin portal.
To refund a payment:
- Open the event that the payment relates to.
- Go to the Manage tab and scroll to the bottom and click on the resident's RSVP to bring up their booking details.
- Click the Refund button on the booking details screen.
- Confirm the refund. The amount is returned to the resident's original card. The transaction status updates to Refund Requested and then to Refunded once Stripe completes the refund (this is usually instant but can take a few business days to appear on the resident's statement).
TIP: Only payments with the status Successful can be refunded. If a payment is still pending or has already been refunded, the Refund button will be greyed out. Cash payments don't go through Stripe, so refund those by paying the resident back directly and updating the transaction status manually.
Each transaction record stores the amount paid, the processing fee, the platform fee, who paid, and which Stripe account the money went into. This is useful at end of month for reconciling against your Stripe dashboard.
Need a hand? If you get stuck setting up Payments or you'd like help configuring multiple Stripe accounts for your community, please reach out to the support team and we'll walk you through it.